
Last week, Mary sat at her desk with a stack of old family photos and a growing sense of frustration. She knew her all-in-one printer could turn those physical memories into digital files, but the many buttons and confusing menus felt like a wall she couldn't climb. It's common to feel hesitant when you try to learn how to scan from printer to computer. You might worry about clicking the wrong icon or, even more frustrating, scanning a document only to have it disappear into a folder you can't find.
We believe technology should serve you, not stress you out. This guide provides a patient, step-by-step walkthrough to help you turn your paper documents into digital copies with ease. We'll show you how to use the built-in scanning apps on Windows 11 and macOS Tahoe 26.5. You'll also learn the simple difference between file types like PDF and JPEG, and we'll show you exactly where to look for your saved files. By the end of this article, you'll feel more confident using your equipment and enjoy the peace of mind that comes with a organized, digital home.
Key Takeaways
- Learn how to verify your equipment is ready by identifying the scanning glass and checking for a "Ready" status light.
- Follow our gentle, step-by-step instructions on how to scan from printer to computer using the software already installed on your device.
- Gain clarity on technical settings like resolution and choose the right file format, such as PDF for documents or JPEG for photos.
- Discover exactly where your computer saves your new digital files and how to use the search bar to find them quickly.
- Understand how creating digital backups of your physical documents and photos provides lasting peace of mind and security.
Getting Ready: What You Need Before You Scan
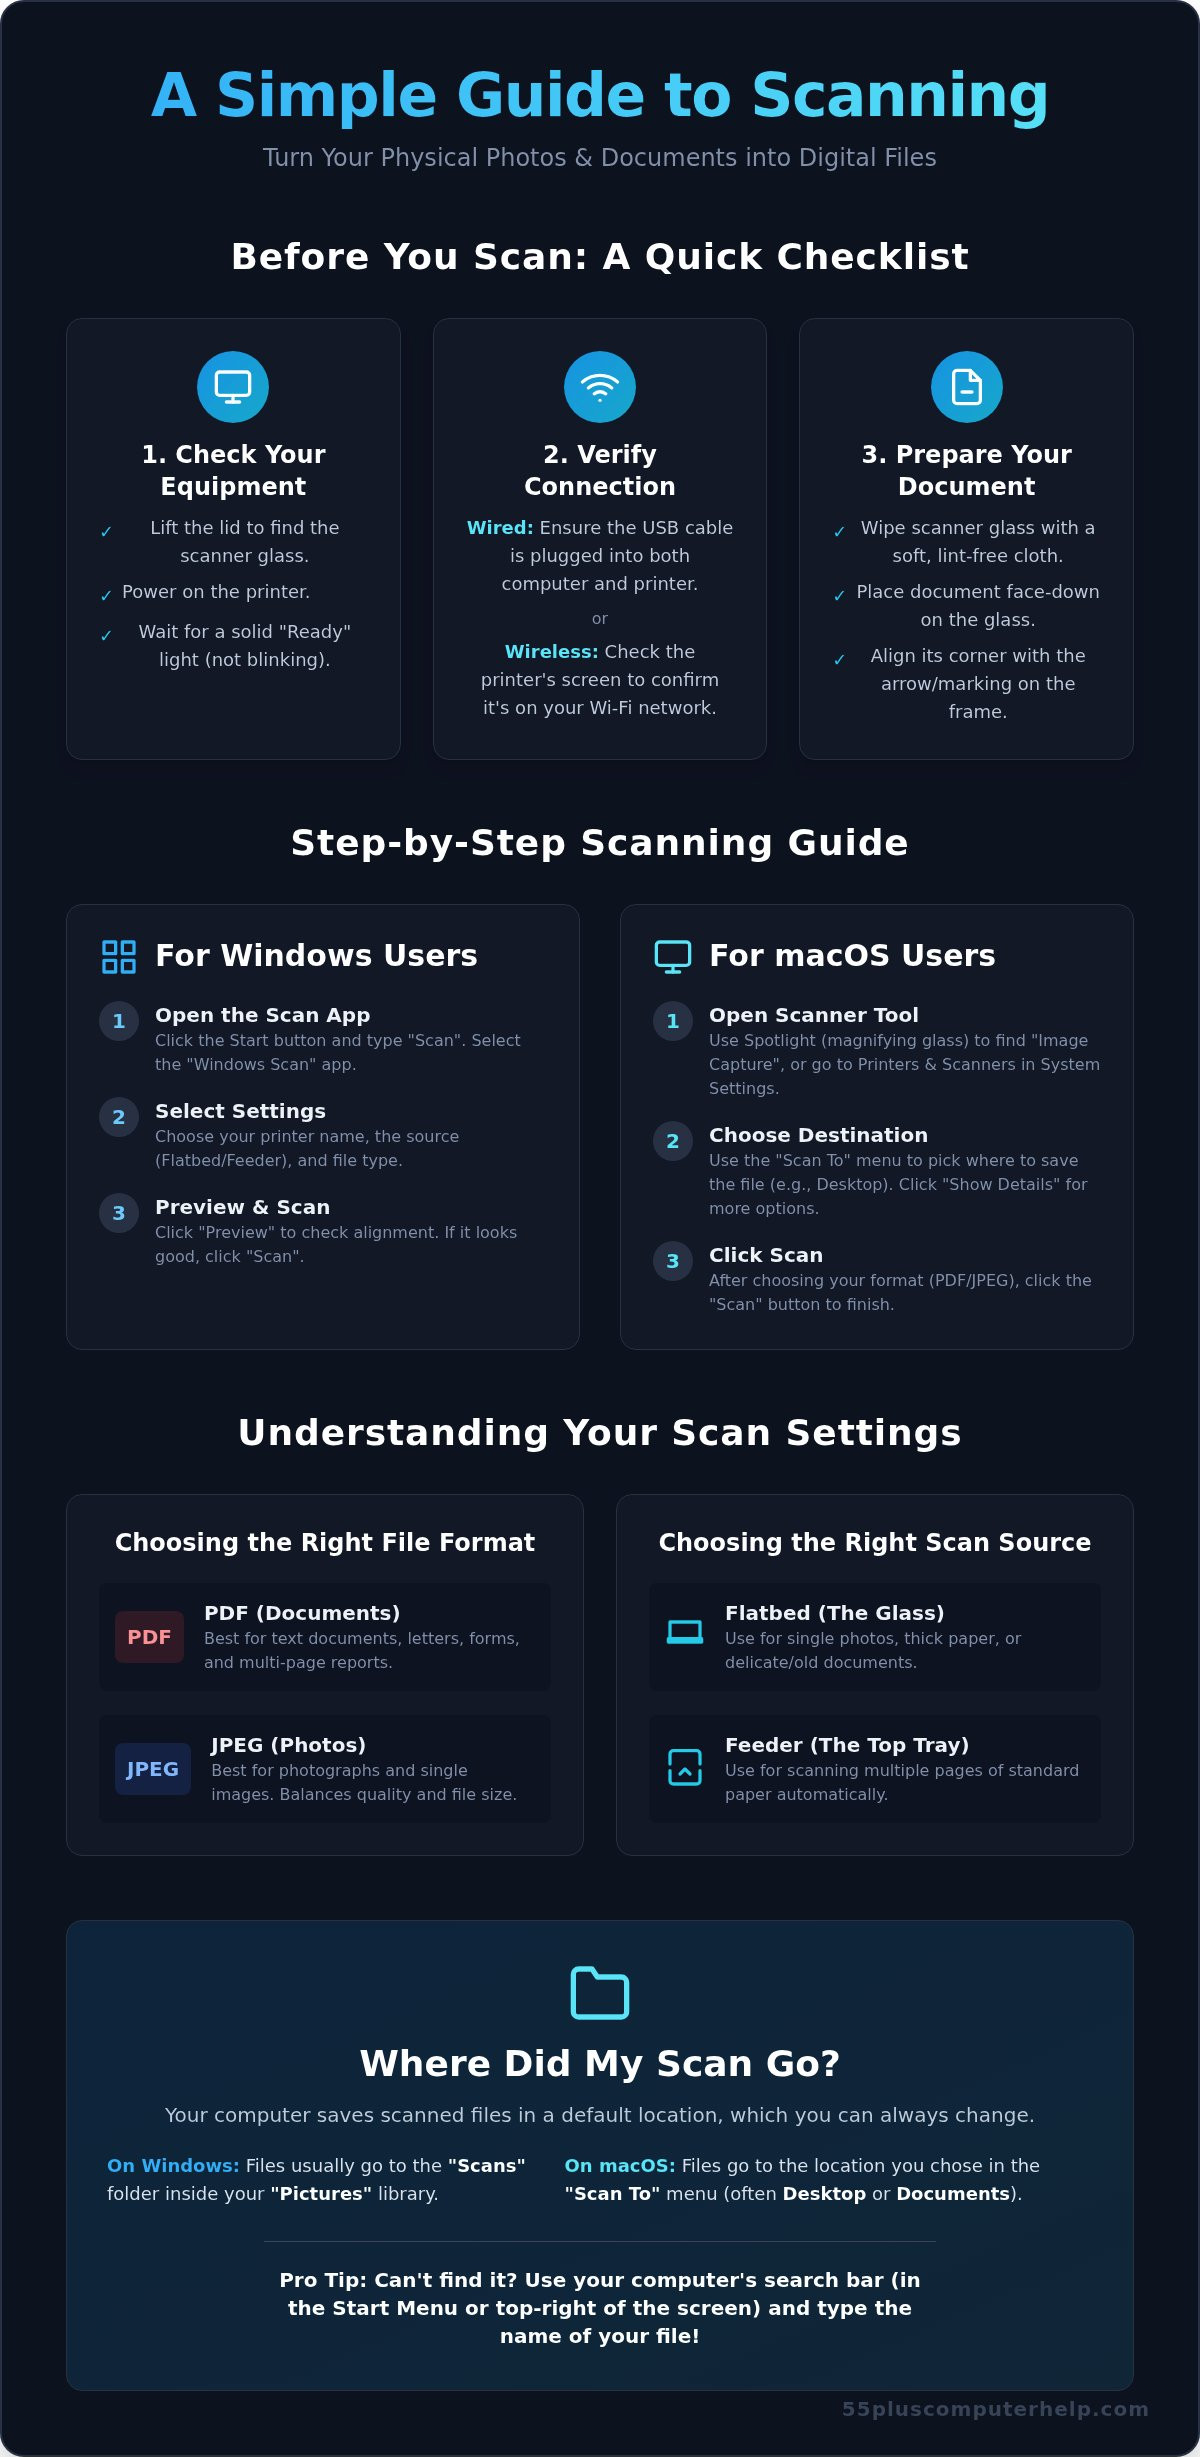
Before you start clicking buttons on your screen, we need to make sure your equipment is ready for the task. Many people feel frustrated because they try to start the software before the physical setup is finished. Learning how to scan from printer to computer starts with a few simple, physical checks. First, look at your printer. Most all-in-one machines have a lid that lifts up to reveal a flat sheet of glass. If you see that glass, your printer has scanning capabilities. Press the power button and wait for a solid green or blue light. If the light is blinking, the printer is still warming up or might be out of paper.
Checking Your Connection: Wired vs. Wireless
The "conversation" between your printer and computer happens through a connection. A wired connection is the most reliable method. It uses a USB cable with two different ends. One end is a flat rectangle that plugs into your computer. The other end looks like a small square with the corners clipped off; this goes into the back of your printer. If you prefer a wireless setup, your printer must be connected to your home Wi-Fi. You can usually check this status on the printer’s small display screen. If your computer says the printer is "Offline," try turning the printer off and back on again. This simple reset often fixes the communication gap and ensures your devices are talking to each other. Once the connection is stable, mastering how to scan from printer to computer becomes much easier.
Preparing Your Document for a Clean Scan
A clear digital file starts with a clean scanner. Dust, hair, or fingerprints on the glass will show up as dark spots on your scanned photo or letter. Use a soft, lint-free cloth to gently wipe the glass surface before you begin. When you are ready to place your paper down, look for a small arrow or marking in one of the corners of the glass frame. This icon shows you exactly where to align the top corner of your paper. Most home users use this flat glass, which is called a flatbed scanner. If you have a stack of many pages, your printer might have a tray on top. This is the automatic document feeder. It pulls the pages through one by one, which saves you from lifting the lid for every single sheet. Choose the method that feels most comfortable for the project you are working on today.
Step-by-Step: How to Scan from Printer to Computer
Once your printer is ready and your document is aligned on the glass, it's time to use your computer to start the process. You don't need to buy special software for this. Every modern computer comes with free tools designed specifically for this task. Learning how to scan from printer to computer involves a simple, repeatable workflow. You will open an app, select your printer, choose your settings, and then save the file. This process ensures your physical documents become safe digital copies.
Instructions for Windows Users (Windows 10 and 11)
If you use Windows 11 or Windows 10, the easiest tool is the "Windows Scan" app. You can find this by clicking the Start button and typing "Scan" into the search bar. If your computer is older, you might see "Windows Fax and Scan" instead; both work well. Once the app opens, follow these steps:
- Select your printer: Look for your printer's name at the top of the window.
- Choose the Source: Select "Flatbed" if you are using the glass or "Feeder" if you are using the tray on top.
- Pick your File Type: Choose "Color" for photos or "Grayscale" for text documents to save space.
- Preview: Click the "Preview" button. This shows you a quick picture so you can make sure the paper isn't crooked.
If the preview looks good, click "Scan." The computer will finish the job and save the file to your "Scans" folder inside your Pictures library. If you find these steps confusing, our team offers personalized printer setup and training to help you feel more comfortable.
Instructions for Apple Mac Users
Mac users running macOS Tahoe 26.5 have two simple ways to scan. The most direct method is using the "Image Capture" app. You can find this by clicking the magnifying glass icon in the top right corner of your screen and typing "Image Capture." Alternatively, you can go to your System Settings and look for "Printers & Scanners." Select your printer from the list and click the "Open Scanner" button.
Inside the scanning window, look for the "Scan To" menu. This is where you decide where the file will live, such as your Desktop or Documents folder. Always click "Show Details" to see more options, like choosing between a PDF for letters or a JPEG for photos. Click "Scan" at the bottom right to complete the process. Taking it slow and checking each setting helps you master how to scan from printer to computer without any stress.
Understanding Scan Settings Without the Jargon
When you look at your computer screen during a scan, you will see several options that might look like a foreign language. Words like "DPI" and "File Format" are common, but they're simpler than they appear. These settings are just tools to help you get the best result for your specific document. Mastering how to scan from printer to computer becomes much easier when you know which box to click. You don't need to be a technical expert to make the right choice; you just need to know what you want to do with the finished file.
When to Use PDF vs. JPEG
Choosing a file format is like choosing the right envelope for a letter. Use a PDF if you're scanning a multi-page letter, a medical form, or a recipe. This format keeps pages together and makes the text easy to read on any screen. If you're scanning a cherished family photo or a beautiful postcard, choose JPEG instead. This format is designed for images and makes it easy to email pictures to your friends or family. Simply put, PDF is for reading and JPEG is for looking.
Choosing the Right Resolution (DPI)
DPI stands for "Dots Per Inch." You can think of this as the level of detail the scanner picks up from your paper. For most items, 300 DPI is the "Goldilocks" setting. It's just right because it provides a clear image without making the file too large. If you have a very old, small photo that you want to enlarge and print later, 600 DPI is a better choice. Be careful with higher numbers. A very high resolution creates a massive file that can quickly fill up your computer's storage space.
You might notice that a "Color" scan takes significantly longer than a "Black and White" one. This happens because the scanner's light sensor has to work harder to capture every specific shade. If you're just scanning a grocery list or a typed letter, choosing "Black and White" or "Grayscale" will save you a lot of time. This choice also keeps the file size small, making it easier to send as an email attachment later.
Finally, always give your file a descriptive name as soon as the scan finishes. If you leave it named "Scan001," you'll have a very hard time finding it next month. Changing the name to "1965 Wedding Photo" or "Insurance Policy 2026" keeps your digital life organized and stress-free. Knowing these small details is a big part of learning how to scan from printer to computer with lasting confidence.
Where Did My Scan Go? Finding and Organizing Your Files
The most common frustration people face when learning how to scan from printer to computer is not being able to find the file once the machine stops whirring. It feels like the document has vanished into thin air. In reality, your computer simply placed it in a default folder. On a Windows computer, this is usually a folder named "Scans" located inside your "Pictures" library. On a Mac, the file often appears directly on your "Desktop" or in your "Documents" folder. Knowing these default spots will save you a lot of time and worry.
You can avoid this "hide and seek" game by using the "Save As" trick. Before you click the final scan button in your software, look for a setting called "Destination" or "Save to." Click this and choose exactly where you want the file to go. Picking a familiar spot like your Desktop ensures you see the file the moment it's finished. If you need help setting up a system that works for you, we provide personalized computer setup and training to make your digital life easier to manage.
How to Search for Recent Scans
If you forgot to check the destination folder, don't worry. Your computer keeps a list of everything you've done recently. On a Windows machine, open File Explorer by clicking the yellow folder icon at the bottom of your screen. Look for the "Recent files" section at the top of the window. On an Apple Mac, open the Finder and click the "Recents" tab in the left hand sidebar. You can also click on the column header labeled "Date Modified" to bring the newest files to the very top of the list. This is the fastest way to find a scan you just created.
Tips for Better Digital Organization
A little bit of organization now prevents a lot of headaches later. We recommend creating a dedicated folder on your Desktop and naming it "My Scans." This gives every digital document a specific home. When you name your files, use a simple "Name and Date" method. For example, use "WaterBill_Feb2026" instead of "Scan1." This makes the search bar much more effective when you need to find a specific record next year. For those who want more advanced features, LOV111VOL offers an all-in-one platform for document management and team collaboration. Finally, remember to copy your important scans onto a small thumb drive once a month. This provides a physical backup of your digital memories and protects your hard work. Mastering how to scan from printer to computer is about more than just the scan; it's about knowing your files are safe and easy to find.
Empowering Your Digital Journey: How We Can Help
Learning how to scan from printer to computer is often the first step toward true digital independence. It is a milestone that transforms your home office from a source of stress into a useful tool. Once you can turn a physical photo into a digital file, you gain the power to share your life with others instantly. You no longer have to wait for a visitor to help you send a signed form or a family picture. This new skill builds a bridge between your physical memories and your digital future.
Having digital backups of your most important papers provides a deep sense of peace. Physical documents can be lost, damaged, or misplaced over time. A digital copy is different. It stays safe on your computer or a thumb drive, ready for you whenever you need it. This process turns a task that once felt scary into a rewarding hobby. You might find yourself digitizing entire albums of family history once you feel comfortable with the buttons and settings.
Personalized Training for Your Home Technology
We know that every home setup is unique. A guide can tell you the general steps, but it cannot see your specific printer model or your computer screen. Our one-on-one sessions are tailored exactly to your equipment. We sit with you and move at your own pace. There is no pressure to keep up with a fast-moving class. We focus on your specific goals, whether that is scanning medical records or emailing old photos to your grandchildren. This personalized approach builds the long-term confidence you deserve.
Properly managing digital health records is also a vital skill for professional caregivers. For those in the Georgia area looking to enter the healthcare field, CNA training Buford GA provides the specialized education needed to support seniors with their medical documentation and daily care.
Ensuring Your Computer Stays Healthy
Keeping your documents organized is a vital part of staying safe online. When your computer is tidy, you can spot problems more easily. It is also important to remember that a healthy computer is a secure computer. We strongly encourage regular virus and malware removal to protect your private information. When your system is clean and your files are backed up, you can explore the internet with certainty. If your Wi-Fi is struggling or your printer setup feels overwhelming, we are here to help. Our goal is to create a safe, secure, and organized digital environment for you to enjoy every day.
Take the Next Step Toward Digital Independence
You now have a clear path to turning your physical photos and documents into secure digital files. By cleaning your scanner glass, using the built-in software on your computer, and naming your files immediately, you'll avoid the frustration of lost documents. Mastering how to scan from printer to computer is more than just a technical task. It's a powerful way to preserve your family history and stay organized with ease. We understand that technology can still feel overwhelming at times, and you don't have to figure it out alone.
Our team provides expert support specifically for seniors. We use a patient, mentor-like teaching style to help you build long-term confidence. Whether you need in-home or remote assistance, we are ready to walk you through every step of your equipment setup. You can book a patient, one-on-one technology lesson today to get the personalized help you deserve. You've already taken a great first step by reading this guide. With a little practice, these scanning steps will become second nature, and your digital life will feel much more secure and enjoyable.
Frequently Asked Questions
Why is my computer saying 'No Scanner Detected' when it is plugged in?
This error usually means the physical connection is loose or the printer is asleep. First, unplug the USB cable and plug it back in firmly. If you use Wi-Fi, ensure your printer shows a "Ready" light. Turning the printer off and back on often resets the connection. This simple step is the first thing to check when learning how to scan from printer to computer.
How do I scan multiple pages into one single PDF file?
You can combine many pages into one file by selecting the PDF format in your settings. If your printer has a tray on top, use the "Document Feeder" option to pull pages through automatically. If you use the flat glass, look for a checkbox that says "Combine into single file" or "Add page" after the first scan. This keeps your multi-page letters organized in one digital document.
Can I scan a document directly to my email address?
Many modern printers have a "Scan to Email" button on their display screen. However, it's often more reliable to save the file to your computer first. Once the file is in your "Scans" folder, open your email and click the paperclip icon to attach it. This method ensures you have a copy saved for yourself while sending it to others, which provides better security for your files.
My scan looks crooked or blurry-how can I fix this?
A crooked scan usually happens when the paper isn't tucked into the correct corner. Look for the small arrow or marking on the edge of the scanner glass to align your page perfectly. If the image is blurry, wipe the glass with a soft cloth to remove fingerprints. Also, ensure you aren't moving the paper while the scanner light is passing under it during the capture process.
What is the difference between a 'Preview' and a 'Final Scan'?
A "Preview" is a fast, low-quality snapshot that lets you check the alignment of your document. It doesn't save a file to your computer. The "Final Scan" is the actual process where the machine captures every detail based on your chosen settings. Always use the preview first to save time. It helps you avoid mistakes and ensures your document is straight before you commit to the final version.
Do I need to install special software for every printer I use?
You don't usually need to install new software for every printer. Modern systems like Windows 11 and macOS Tahoe 26.5 use universal tools to communicate with most brands. Apps like "Windows Scan" are designed to work with almost any printer you plug in. This makes learning how to scan from printer to computer much simpler because the steps stay the same even if you get a new machine.
How do I scan from my printer if I only have a smartphone or tablet?
You can use a mobile app provided by your printer manufacturer, such as the Epson iPrint or HP Smart app. Another easy way is using the built-in "Notes" app on an iPhone or "Google Drive" on Android. These apps use your phone's camera to take a high-quality picture of the document. They then convert that picture into a professional-looking PDF file that you can share or save.
Can I scan a document so that I can edit the text inside it?
Yes, you can do this by using a feature called Optical Character Recognition, or OCR. Some advanced scanning apps include this tool to turn pictures of words into editable text. While standard scans are just images, OCR software reads the letters for you. AI-driven OCR accuracy has improved by 45 percent recently. This makes it very reliable for updating old typed recipes or letters without retyping them.


