
Did you know that people will take nearly two trillion digital photos this year? With 90% of adults over age 50 now owning a smartphone, many of those memories are sitting right in your pocket. It's completely normal to feel overwhelmed when you have thousands of images scattered across old devices and tangled charging cables. You might even worry about "breaking something" or accidentally deleting a precious family moment while trying to figure out how to organize digital photos for seniors.
We want to help you turn that frustration into a sense of accomplishment. This guide offers a simple, stress-free way to find, sort, and protect your lifetime of digital memories. You'll learn how to create one searchable library and set up a secure backup for true peace of mind. We'll also show you how to easily share your favorite pictures with your children and grandchildren through email or text. By following these methodical steps, you can ensure your legacy is safe and easy to enjoy for years to come.
Key Takeaways
- Learn how to turn a scattered digital mess into a searchable archive that your family will cherish for generations.
- Discover common "hiding spots" where your memories are stored, including old computers and your current smartphone.
- Master a simple four-step workflow that explains how to organize digital photos for seniors using a clear and logical folder system.
- Understand the difference between cloud and physical storage so you can pick the safest way to protect your photos.
- Find out how to easily share your favorite moments with loved ones and where to get patient, one-on-one help when you need it.
Why Organizing Your Digital Photos is the Best Gift for Your Family
For decades, we kept our memories in heavy albums or boxes of loose prints. Then the digital revolution changed everything. We moved from rolls of film with 24 exposures to taking 20 pictures in a single afternoon. This digital explosion over the last 20 years means you likely have more photos than ever before. However, these memories are often harder to enjoy because they are hidden away. Learning how to organize digital photos for seniors is about more than just cleaning up a computer. It's about preserving your life story for your children and grandchildren in a way they can actually use.
Starting this project can feel like a mountain to climb. You might worry about losing a file or making a mistake that deletes years of history. It's completely normal to feel this way. The key is to remember that organization turns a confusing digital mess into a searchable family archive. When you understand how to organize digital photos for seniors, you gain the emotional relief of knowing your history is secure. You can finally stop worrying about the technical side and start focusing on the stories behind the faces.
The Problem with the Digital Shoebox
In the past, you could at least touch a physical photo. Today, your memories are often trapped on an old Windows laptop, a dusty iPad, or a smartphone you rarely use. This creates a digital shoebox where images are scattered across multiple devices and forgotten folders. Modern technology often sorts things by the date the file was created. This isn't always helpful when you are looking for a specific holiday from ten years ago. Digital clutter is the modern equivalent of an unlabeled box of negatives that nobody can identify. It makes your devices feel heavy and complicated.
The Goal: Accessibility and Sharing
The real magic happens when you can actually find what you're looking for. Imagine wanting to show a friend a picture of your garden and finding it in seconds. When your library is tidy, you can focus on the joy of the memory instead of the stress of the search. A clean system makes email sharing much easier. You won't have to hunt through thousands of duplicates just to send one high-quality image to your daughter.
You might choose to use specialized Image organizer software to help group your people and places together. Once your digital files are in order, you can even create beautiful physical photo books to give as gifts. This process turns a confusing pile of data into a secure, accessible legacy. You don't have to do it all at once. Taking small, steady steps with a patient mentor can make the task feel light and achievable.
Locating Your Memories: Where Are Your Photos Hiding?
Before you can begin sorting, you need to know exactly what you have. Digital photos are like a treasure hunt. They often hide in several different places at once. Finding where your pictures are is the first step in learning how to organize digital photos for seniors. Your goal is a concept called "Centralization." This simply means gathering every image from every device and putting them into one "digital room" or master folder. When everything is in one place, the task becomes much smaller and easier to manage.
Today, your smartphone is likely your primary camera. Since 90% of adults over age 50 now own a smartphone, most of your recent memories are probably there. However, don't forget about your old computers, tablets, or even your email inbox. Grandkids often send beautiful pictures as email attachments that never make it into a photo gallery. This process of gathering files is a big part of how to organize digital photos for seniors effectively. If finding these files feels like a chore, a patient mentor can help through personalized technology training.
Checking Your Mobile Devices
On an iPhone or Android, your photos live in an app usually called "Photos" or "Gallery." This is often called your "Camera Roll." It's helpful to remember that your tablet might have a completely different set of pictures than your phone. If you took a photo with your iPad, it might not show up on your smartphone unless you have a syncing service turned on. Here is a quick tip: the device you used to take the photo usually holds the highest quality version. Try to find that original file whenever possible.
Finding Photos on Computers and External Storage
Your computer is often the biggest hiding spot for older memories. On both Windows and Mac, most images are stored in a folder simply named "Pictures." You should also look for physical items you may have tucked away in a desk drawer. These include:
- USB Thumb Drives: These small sticks were often used to "back up" photos years ago.
- SD Cards: These tiny flat cards might still be inside your old digital camera.
- External Hard Drives: These larger boxes plug into your computer and might hold thousands of forgotten images.
Take your time with this search. You don't need to find everything in a single day. Just focus on identifying which devices hold your precious moments. Once you know where the photos are hiding, you can move on to the next step of bringing them all together safely.
Cloud vs. Physical Storage: Which is Best for Seniors?
Once you have located your photos, you need to decide where they will live long-term. This is a vital part of learning how to organize digital photos for seniors. You generally have two main choices: online storage or a physical device in your home. Some people prefer to see and touch their storage equipment. Others like the convenience of a system that works automatically in the background. The most important thing is that you pick a method you understand and feel comfortable using every day.
You may have heard people talk about "The Cloud." While it sounds mysterious, it's actually quite simple. The Cloud is just a very secure, powerful computer owned by a trusted company like Apple, Google, or Microsoft. Instead of keeping your photos only on your own device, you keep a copy on their secure system. This keeps your memories safe even if your computer stops working. It's a reliable safety net for your family history.
The Benefits of Cloud Services (Google Photos, iCloud)
Cloud services like Google Photos or iCloud offer incredible convenience through automatic syncing. When you take a picture on your phone, it travels safely to the cloud without you doing a thing. These services also help you find memories quickly. They use smart technology to group photos by faces or locations. You can simply type "dog" or "beach" into a search bar to find every matching image in seconds. This makes the process of how to organize digital photos for seniors feel much less like a chore. Best of all, if you ever lose your phone, your photos stay safe in your account.
The Role of External Hard Drives
An external hard drive is a physical "safe" for your digital files. It is a small box that plugs into your computer with a cord. Many seniors prefer this because it involves a one-time cost rather than a monthly subscription. You own the drive forever, and it sits right on your desk. Having a physical copy in your home provides a great sense of security. We often recommend using a hard drive as a secondary backup. If you have your photos in the cloud and on a hard drive, you have double the protection.
Security is a common concern when moving photos online. While major cloud companies spend billions on security, you still want to keep your own computer healthy. Staying up to date with virus and malware removal ensures your connection to the cloud remains private and safe. Whether you choose a physical drive or a digital service, the goal is the same. You want a secure home for your memories that gives you total peace of mind.
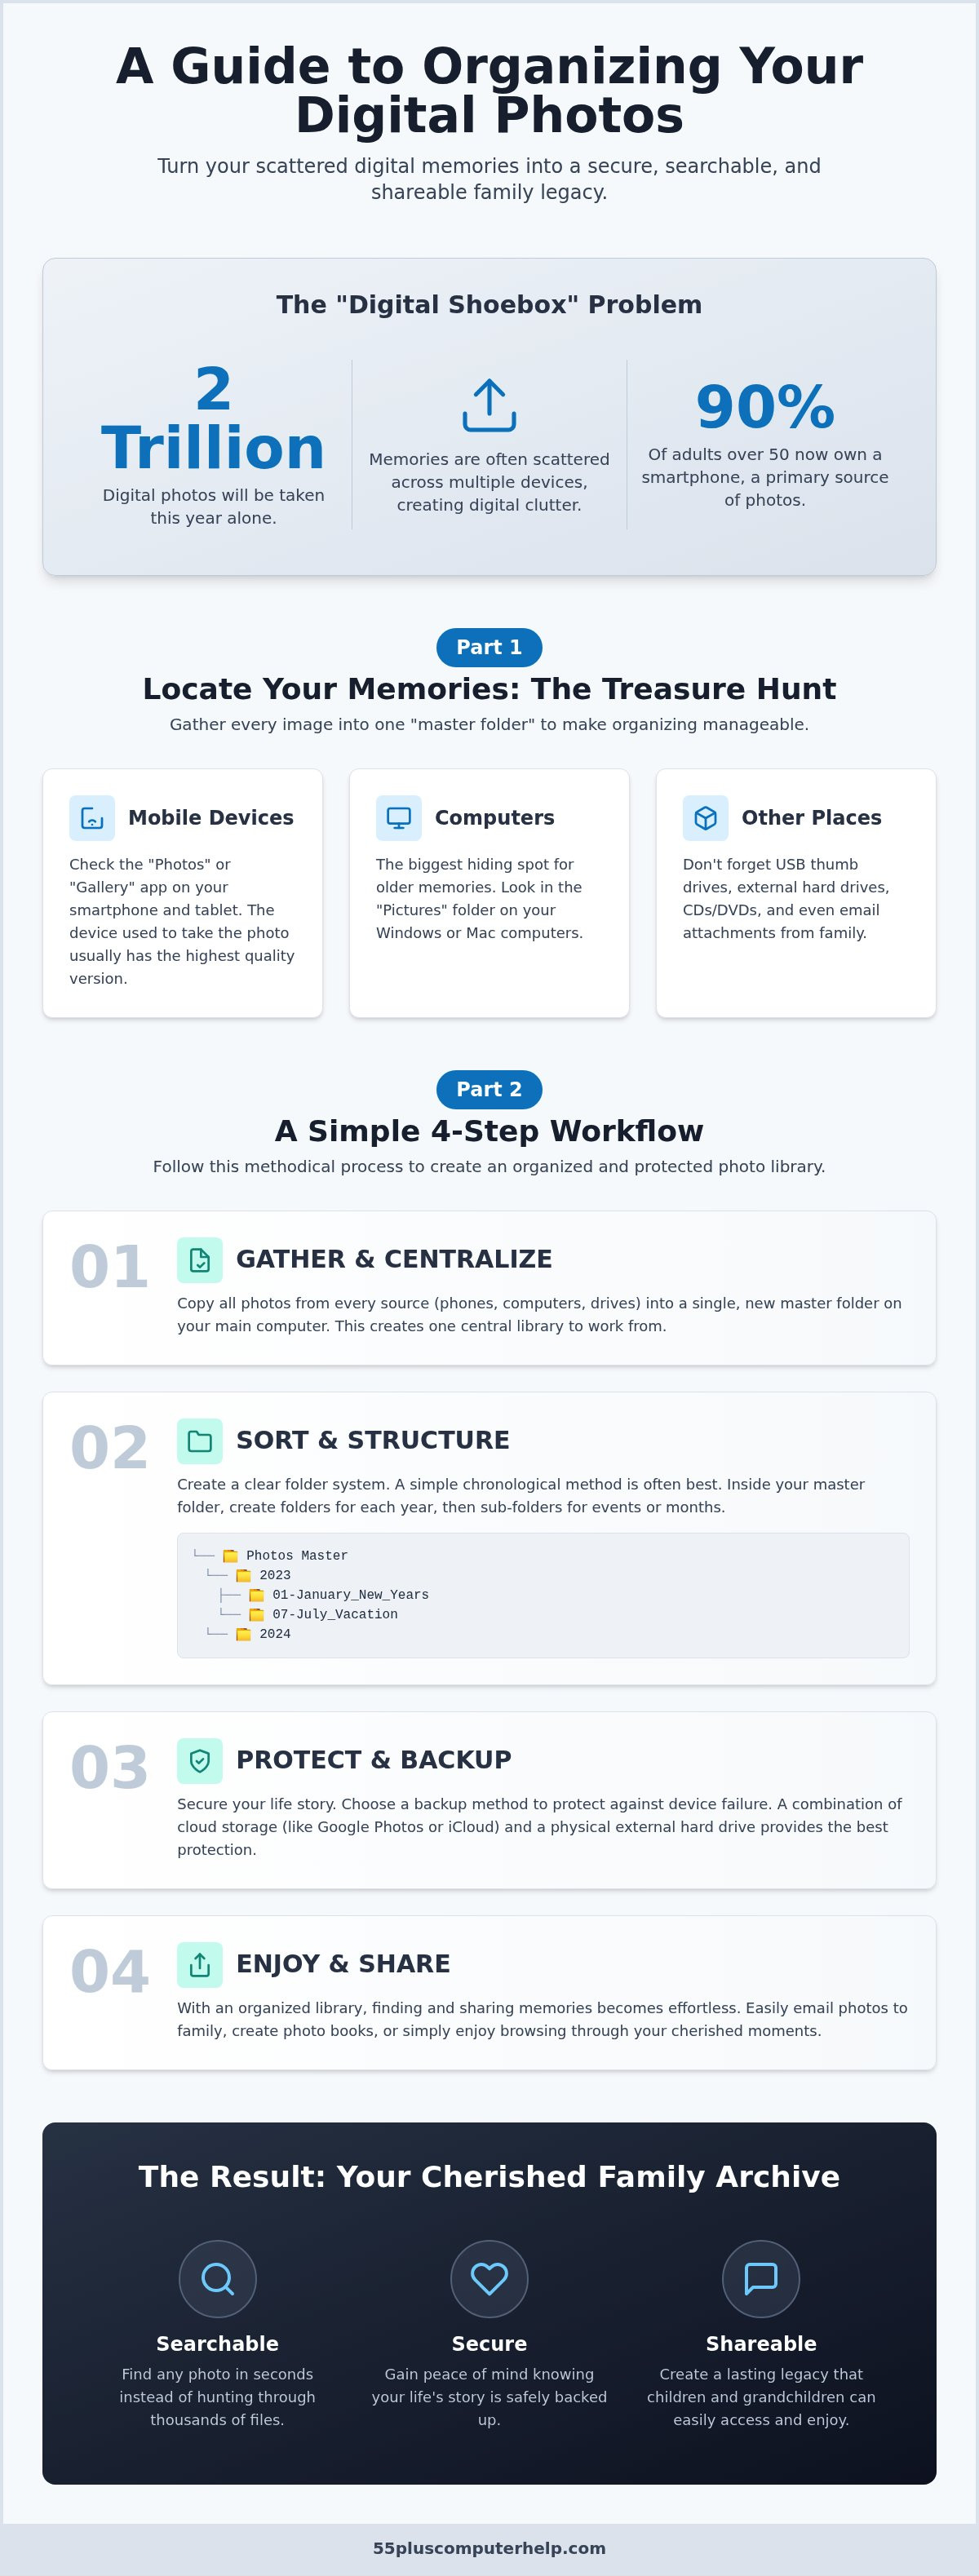
A Simple 4-Step Workflow for Organizing Your Photos
Organizing thousands of images is much easier when you follow a steady, methodical plan. We always use a "Safety First" approach for this project. Before you move or delete a single image, you should copy every file into one central location. This ensures you never lose a precious memory while trying to tidy up. Learning how to organize digital photos for seniors is not about speed. It's about creating a system that makes you feel in control of your history.
We recommend using the "One-Touch" rule as you work. This means you look at a photo once and decide its fate immediately. Does it belong in a year folder, or is it a duplicate that can be moved aside? Making quick decisions prevents you from feeling stuck. If the task feels too large, remember that you can do this in small, 15-minute sessions. Each small win brings you closer to a tidy library.
Step 1: The Master Collection
Start by creating a new folder on your computer desktop. Label this folder "Incoming Photos." Move every picture you found on your various devices and sticks into this one place. This folder acts as the sorting table for your project. It's important that you do not delete anything during this initial gathering phase. Just focus on getting every image into this single digital room so you can see the full scope of your collection.
Step 2: Sorting by Chronology
The human brain finds things best when they are in order of time. Most computers have a "Sort by Date" feature that does the heavy lifting for you. Use this tool to see your history unfold from the oldest to the newest. Create main folders for each year, such as "2024 Photos." Inside those, you can make smaller sub-folders for specific months or events. A folder labeled "Jan - Mary's Wedding" is much easier to find later than a file with a random number name.
Step 3: The Gentle Cull (What to Keep)
Many people stop before they start because they are afraid of deleting the wrong thing. You don't have to delete anything permanently right away. If a photo is blurry, dark, or an accidental shot of the floor, move it to a folder labeled "Trash - Review Later." This removes the clutter from your main view without the stress of a permanent choice. You can also use the "Favorites" heart icon on your smartphone to mark the very best shots. This makes them stand out from the duplicates and "just okay" pictures.
Duplicates are the most common source of digital clutter. You might have the same photo of your grandson three times because it was on your phone and in an email. Once everything is in your master folder, these extras become very easy to spot and move to your review folder. If you want someone to guide you through this process, our personalized technology training provides a patient mentor who can sit with you and help you sort every image safely.
Sharing Your Memories and Getting Professional Support
The final step of your journey is the most rewarding. After you have put in the work to tidy your library, you can move from "organizing" to "enjoying." A clean photo collection is a gift that keeps on giving. It allows you to look back on your life story and share those moments with the people you love most. You no longer have to worry about how to organize digital photos for seniors because you now have a system that works for you.
There are many ways to see your photos every day without even touching a computer. Digital photo frames are a wonderful option for any room in your house. You can load these frames with your newly organized folders. They will cycle through your favorite memories, showing a different smile every few minutes. It's a simple way to bring your digital archive into your physical living space.
Sharing with the Next Generation
Sharing photos with your family has never been easier once your files are in order. While you can text a single photo, sharing a link to an entire album is often better. Texting can sometimes make photos look blurry or small. Sending a link to a shared album keeps the quality high so your family can print them if they wish. Your grandkids will especially love seeing "throwback" photos of their parents from years ago. These images are vital for family history and genealogy projects. By keeping your photos organized, you're making it easy for the next generation to learn about their roots.
How a Patient Mentor Can Help
We know that even with a guide, some parts of this process feel heavy. Moving thousands of files or setting up a cloud account involves technical "heavy lifting" that can be intimidating. This is exactly where a patient mentor makes a difference. Instead of struggling alone, you can have someone sit with you and explain "why" things are happening on your screen. This turns a potentially frustrating task into a calm, educational experience.
Our goal is to help you feel independent and confident with your devices. A mentor can help you navigate the tricky parts of your smartphone or computer while you focus on the memories themselves. If you're ready to finish your photo project with ease, you can book a personalized lesson today. We provide the one-on-one support you need to ensure your lifetime of memories is safe, sorted, and ready to share.
Preserving Your Legacy for the Next Generation
Taking control of your digital library is a rewarding way to protect your family history. You now have a clear path for how to organize digital photos for seniors by gathering your files, choosing a secure home for them, and following a simple sorting workflow. These steps turn a confusing digital mess into a collection that you can actually enjoy and share with your grandkids.
If you still feel overwhelmed by the technical side of this project, you don't have to do it alone. Our patient, senior-focused mentors offer expertise in photo management and data backup to guide you every step of the way. Whether you prefer in-home or remote support options, we can help you finish this task with confidence. Get Personalized Help Organizing Your Memories Today.
You have spent a lifetime making these memories. It's the perfect time to ensure they are safe and ready to be celebrated for years to come.
Frequently Asked Questions
Is it safe to store my private family photos in the Cloud?
Yes, it's very safe to use the cloud for your private memories. Trusted companies like Apple and Google use advanced encryption to protect your files. This means only you can see your pictures. In many cases, the cloud is actually more secure than a single home computer. A computer can break or be lost, but your cloud files stay safe on a remote server. It's a reliable way to protect your family history.
How do I get photos from my old digital camera onto my new iPad?
You can move photos from an old digital camera using a small adapter called an SD card reader. You plug the camera's memory card into the reader and then connect it to your iPad's charging port. The Photos app will automatically open an "Import" tab for you. From there, you can select the specific images you want to save. This is a simple way to bring older memories onto your modern mobile device.
What is the easiest way to find a specific photo of my grandson from five years ago?
The easiest way is to use the search bar within your Photos app. You can type in a person's name, a location, or even a year like "2019." Smart technology helps identify the faces and objects in your library automatically. When you are learning how to organize digital photos for seniors, using the search feature saves you hours of scrolling. It turns a massive collection into a searchable, easy-to-use family archive.
Will I lose my photos if I stop paying for a monthly storage subscription?
You won't lose your existing photos if you cancel a storage subscription, but you will lose the ability to add new ones. Most services will keep your files safe for a period of time while your account is over its limit. However, your devices will stop syncing and backing up new memories. It's always a good idea to have a physical backup on a hard drive just in case your subscription plans change.
How can I tell if a photo is a duplicate or just a similar shot?
You can identify a duplicate by looking for identical file names or file sizes. Often, a duplicate file will have a number like "(1)" at the end of the name. Similar shots are different because the person might have a slightly different expression or pose. Many modern smartphones now have a "Duplicates" folder that finds these for you. This tool is a great help when you're figuring out how to organize digital photos for seniors.
Can I organize my digital photos without using a computer?
Yes, you can organize your photos using just a smartphone or a tablet. Most photo apps allow you to create folders and move images directly on the screen. While it takes a bit more patience than using a computer mouse, it is a very effective method. You can sort your library while sitting in your favorite chair. This approach is perfect for those who want to keep their technology simple and portable.
What should I do with my physical printed photos once they are scanned?
You should keep your physical photos in archival-safe, acid-free boxes even after you scan them. While digital copies are great for sharing, the original prints are the primary record of your family history. Store these boxes in a cool, dry place away from direct sunlight. This ensures that your physical legacy remains intact for future generations. You can enjoy the digital versions on your screen while knowing the originals are tucked away safely.
How do I send a large group of photos to my daughter without them getting blurry?
Sending photos through a text message often makes them look blurry because the phone shrinks the file size. The best way to send a large group of high-quality images is to use a shared album link. You can create an album in your Photos app and send the link to your daughter via email. This allows her to see and download the original, clear versions of the pictures without any loss in quality.


