
You have an important paper in your hand and a deadline to meet, but the technology just won't cooperate. You place the page on the scanner, click a button, and then wonder where it went. It's frustrating to feel like your computer is hiding your own files from you. Learning how to scan a document from a printer to a computer shouldn't feel like a guessing game. We understand that the fear of pressing the wrong button or getting lost in a maze of settings is very real.
It's okay to feel overwhelmed by confusing cables or wireless connections that don't seem to talk to each other. You deserve to feel capable and independent when using your own equipment. This guide provides a patient, step-by-step path to move your paper documents onto your screen with ease. We'll strip away the technical jargon and focus on the simple actions that get the job done right on the first try.
We will look at the best free tools for your computer and show you exactly where your files go after the scan is finished. By the end of this article, you'll know how to save your documents as clear PDFs or images and find them whenever you need them. You'll have the skills to handle your digital paperwork with total confidence.
Key Takeaways
- Start with a solid foundation by checking your connections so you can focus on the task without technical glitches.
- Discover the exact buttons to press on your Windows PC or Mac to master how to scan a document from a printer to a computer with confidence.
- Learn where your computer saves new scans and how to rename them so you can find your important files months from now.
- Master a simple "unplug and wait" technique to fix common printer errors without feeling frustrated or overwhelmed.
- Gain independence by turning physical paperwork into digital files that are safe, organized, and easy to share with family.
Preparing Your Printer and Document for Success
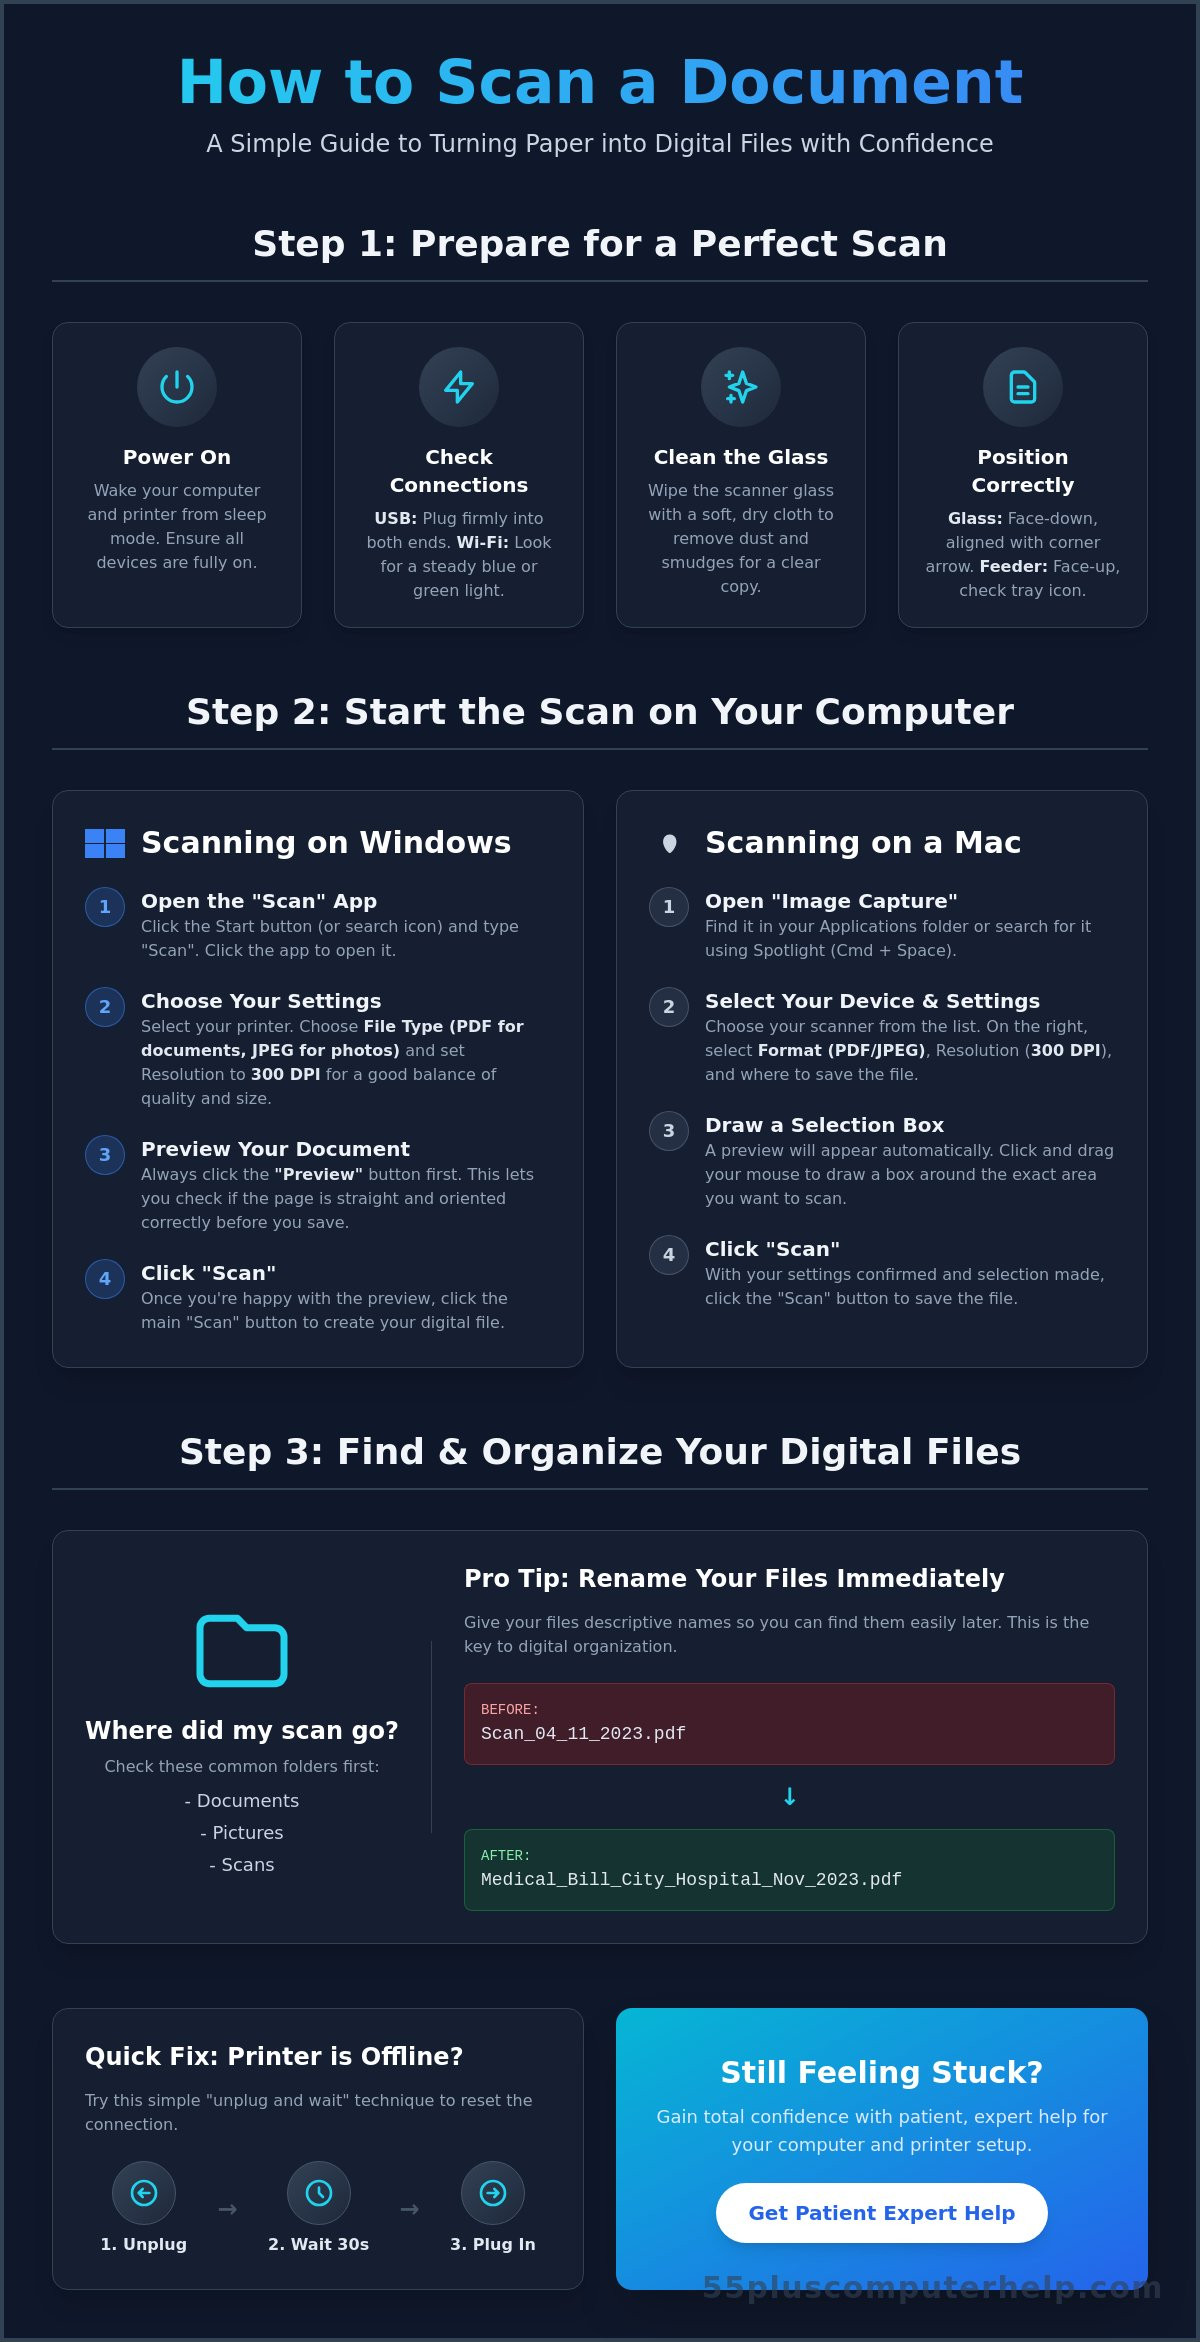
Scanning is simply the process of creating a digital copy of your physical paperwork. Think of it like taking a high quality picture that lives on your computer screen instead of in a photo album. This device, often called an Image scanner, allows you to save medical records, old letters, or tax forms safely. Learning how to scan a document from a printer to a computer starts with making sure your equipment is ready to talk to each other.
Before you begin, check that both your printer and your computer are turned on. It sounds simple, but many printers go into a sleep mode to save energy. Press a button on the printer panel to wake it up. If the screen is dark, it won't be able to receive instructions from your computer. You should also ensure you have enough space on your desk to open the scanner lid fully without hitting any shelves or cables.
Most home printers have two ways to scan. The first is the flatbed glass, which is the large glass surface under the lid. This is perfect for single pages, thick items, or fragile photos. The second is the document feeder, which is the tray on top that pulls pages through automatically. If you have a stack of several pages, the feeder saves a lot of time. Before you close the lid, take a quick look at the glass. A tiny speck of dust or a fingerprint can show up as a dark line on your digital file. A gentle wipe with a soft, dry cloth ensures your copy is crystal clear.
Checking Your Connections
Your printer needs a clear path to send information to your computer. If you use a USB cable, make sure it's plugged snugly into both devices. This direct connection is often the most reliable choice for beginners because it doesn't rely on the internet. If you prefer a wireless setup, look for a steady blue or green light on your printer. A blinking light usually means the connection is lost. Setting up how to scan a document from a printer to a computer is much easier when the connection is stable. If your computer says the printer is offline, try turning the printer off and back on again to reset the link.
Placing Your Document Correctly
Proper placement is the secret to a professional looking scan. When using the glass, look for a small arrow or marking in one of the corners. This tells you where to align the edge of your paper. Place your document face-down on the glass so the scanner can see the text. If you use the automatic feeder tray, you usually place the paper face-up, but check for a small icon on the tray to be sure. Make sure the paper is flat and not folded at the corners. A wrinkled page can cause a blurry image or even a paper jam in the feeder.
How to Scan on a Windows PC: A Step-by-Step Walkthrough
Most modern computers come with a built-in tool called the Windows Scan app. It's a simple program designed to make the process easy. To find it, click on the "Start" button in the bottom left corner of your screen. You can also click the small magnifying glass icon. Type the word "Scan" into the search box. When the app appears, click on it to open a clean, friendly window. This is your main control center for learning how to scan a document from a printer to a computer without any guesswork.
Once the app is open, you'll see a list of printers. Make sure your specific printer name is selected. Below that, you can choose how your scan will look. "Color" is great for photos or cards. "Grayscale" works well for documents with some shading. "Black and White" is the best choice for simple letters or text because it keeps the file size small. Before you click the final button, always use the "Preview" button. This tool is your secret weapon. It shows you exactly what the scan will look like before you save it. If the page is crooked or upside down, you can fix it right then. This saves you from having to do the whole process over again.
If you ever find these steps a bit tricky to manage on your own, our team offers specialized computer setup and training to help you feel more comfortable with your technology.
Using the Windows Scan App
Inside the app, you'll need to pick a file type. Use "PDF" for documents you want to read or email. Use "JPEG" if you're scanning a favorite photograph. You can also adjust the "Resolution" setting. For most papers, 300 DPI is the perfect balance of clarity and file size. A higher number makes the image sharper, but it takes up more room on your computer and might be harder to email later. Once you're happy with the settings, click the "Scan" command at the bottom of the window.
Scanning Directly from Printer Buttons
Many printers have a physical "Scan" or "Scan to PC" button right on the machine. When you press this, the printer's small screen will ask which computer you want to send the file to. Look for your computer's name in the list and select it. If your computer name doesn't appear, it usually means the two devices aren't talking to each other. Check your Wi-Fi light or the USB cable to make sure everything is plugged in correctly. Sometimes a simple restart of both the printer and the computer will make the name show up again.
How to Scan on a Mac: Simple Steps for Apple Users
Apple computers are famous for being user friendly, but finding the right menu can still feel like a little bit of a treasure hunt. If you use a Mac, the tools you need to manage your paperwork are already waiting for you. You don't usually need to download any extra programs to learn how to scan a document from a printer to a computer. Your Mac is designed to recognize your printer the moment it's connected to your home network or plugged in with a cable.
Once you open the scanning window, you might see a very simple screen with just one or two buttons. Look for the "Show Details" button at the bottom of that window. This is a very helpful tool for seniors because it reveals all the hidden settings in one clear panel. Clicking it allows you to see a preview of your page before the final scan. You can also use this panel to tell the computer exactly what to name the file. Giving your document a clear name like "Medical Bill June" right now will save you a lot of time and searching later on.
Using Printers & Scanners Settings
To start, click on the tiny Apple icon in the very top left corner of your screen. Select "System Settings" from the list that appears. You'll need to scroll down the sidebar on the left until you find "Printers & Scanners". Click on your printer's name, and then look for the "Open Scanner" button. When you click it, your printer might make a soft whirring noise as it warms up. This is a good sign. It means your devices are talking to each other. You can watch the progress bar on your screen to see exactly when the job is finished.
The Image Capture Alternative
If the printer settings feel a bit buried, there's another reliable way to get the job done. Every Mac comes with a built-in app called "Image Capture". It's a dedicated tool that has been part of the Apple system for many years. You can find it by opening your "Applications" folder or by using the magnifying glass in the top right corner to search for it. It's a great backup method if the standard settings ever feel confusing.
When Image Capture opens, your printer will appear in the sidebar on the left side of the window. Click on it to see the scanning options. One of the most important things to check here is the "Scan To" box. This setting tells the computer where to put your file once it's finished. Most people find it easiest to choose "Desktop" so the file appears right on the main screen. Once you've picked your spot, just click the "Scan" button and let the computer do the work for you. This is a calm, steady way to master how to scan a document from a printer to a computer while staying organized.
Where Did My Scan Go? Finding and Organizing Your Files
You've clicked the button and heard the scanner finish its work. Now you're looking at your screen, wondering where that digital "picture" went. It's a common feeling of frustration. Many people worry they've done something wrong because the file doesn't just pop up in front of them. Mastering how to scan a document from a printer to a computer is a great achievement, but you also need to know where the computer hides the results.
Once the scan is complete, you can easily share it with others. A great next step is emailing your scanned document to your family, your lawyer, or your doctor. If you find yourself hunting for files every time you use your printer, we can help you get organized with our data backup and recovery services.
Locating the Scans Folder
Most computers have a default "hiding place" for new files. On a Windows PC, look inside your "Documents" folder. You will often find a sub-folder specifically named "Scanned Documents." On a Mac, the file often goes to your "Pictures" folder or directly to your "Desktop." If you still can't see it, use the search bar. This is the small magnifying glass icon. Type in the word "Scan" or "IMG." Your computer will show you a list of all the files that were created recently. This search is a quick way to find a file that seems to have disappeared.
You can also change where these files go in your settings. Before you click the "Scan" button next time, look for a setting called "Destination" or "Save To." Changing this to "Desktop" is a smart move for beginners. This makes the file appear right on your main screen as soon as the printer finishes. You won't have to go digging through folders ever again.
Renaming and Filing for Later
When a scan is first created, the computer gives it a generic name like "Scan123" or "Document001." This isn't very helpful when you're looking for it next month. To fix this, use your mouse to right-click on the file. Choose the "Rename" option. Type in something descriptive like "Water Bill 2026" or "Grandkids Photo." This simple step makes your digital life much calmer. Understanding how to scan a document from a printer to a computer includes learning the filing system that follows the actual scan.
It's also a good idea to create a dedicated "Important Documents" folder. You can drag your new scans into this folder to keep them all in one safe spot. Remember, keeping your computer secure is vital when you're saving sensitive personal files like medical records or bank statements. Organizing your files this way helps you feel independent and in control of your digital records.
When Technology Gets Stubborn: Getting Patient Expert Help
Sometimes, despite your best efforts, the printer simply refuses to cooperate. It's important to stay calm when this happens. Technology can be temperamental, and a small glitch doesn't mean you've done anything wrong. Learning how to scan a document from a printer to a computer is a skill that takes practice. Even experts run into roadblocks from time to time, so don't let a stubborn machine get you down.
One of the most effective tools in your arsenal is the "Unplug and Wait" method. Simply turn off your printer and unplug it from the power outlet. Wait for about 60 seconds before plugging it back in and turning it on again. This gives the device a chance to clear its memory and start fresh. This simple trick often fixes connection issues that seem impossible to solve. It's the technical version of taking a deep breath and starting over.
You don't have to struggle alone for hours. While online forums are often full of confusing technical jargon, a patient mentor provides clarity and peace of mind. A single session of personalized training can turn you into a scanning expert. You'll learn the quirks of your own specific equipment in a supportive, safe environment. It is much better to ask for a hand than to feel frustrated by a faceless screen.
Troubleshooting Common Errors
If your computer says "Scanner Not Found," check your cables or Wi-Fi lights first. If you're using a document feeder and get a paper jam, open the access panel gently. Never pull the paper forcefully, as this could damage the delicate rollers inside your machine. Sometimes, things stop working because your computer needs a software update. Keeping your system current ensures that your computer and printer can still speak the same language. Mastering how to scan a document from a printer to a computer is much easier when your software is kept up to date.
In-Home and Remote Support Options
At 55 Plus Computer Help LLC, we specialize in providing patient, one-on-one assistance tailored to your specific needs. We offer printer setup and software installation to ensure everything works perfectly from the start. Having a mentor show you the process on your own equipment is the fastest way to build confidence. We can guide you through every click until you feel ready to handle it on your own. Taking this first step toward digital independence is much easier with a friendly expert by your side. We value your comfort and want to transform tech frustration into a real sense of accomplishment.
Take the Next Step Toward Digital Independence
You now have the knowledge to handle your paper documents with total confidence. By preparing your equipment and following the right steps for your specific computer, you've already overcome the biggest hurdles. You know where your files are stored and how to keep them organized for the future. Learning how to scan a document from a printer to a computer is a wonderful way to keep your important records safe and share memories with your family.
If you still feel a bit unsure, you don't have to manage it alone. Since 2014, we have specialized in helping seniors master their devices with ease. Our patient mentors speak your language and always avoid confusing industry jargon. We provide both in-home visits and remote assistance to meet you exactly where you are. We are here to ensure you feel supported and capable every step of the way.
Get Patient, In-Home Help with Your Printer and Computer Today
Technology should be a tool that serves you, not a source of stress. With a little practice and the right support, you will be a scanning expert in no time. Be proud of the progress you've made today.
Common Questions About Scanning
Why does my computer say the scanner is not connected when the cable is plugged in?
Your computer might not recognize the scanner if the USB cable is loose or plugged into a faulty port. First, unplug both ends of the cable and push them back in firmly. If that doesn't work, try a different USB port on your computer. Sometimes a simple restart of your printer clears the communication error. This is a very common part of learning how to scan a document from a printer to a computer.
How do I scan multiple pages into one single PDF document?
You can combine several pages into one file by selecting the "PDF" format in your scan settings. If your printer has an automatic document feeder, place the stack of papers in the tray before you start. For flatbed scanners, look for a "plus" sign or an "Add page" button in your scan app after the first page finishes. This allows you to scan the next sheet before saving the final combined file.
Can I scan a document using my smartphone instead of a printer?
Yes, your smartphone can act as a portable scanner using its built-in camera. iPhone users can use the "Notes" app to scan documents quickly. Android users often find a similar scan feature inside the "Google Drive" app. While this is convenient for a single page, a traditional printer usually provides a clearer and more professional image for important records. We offer specialized training if you want to learn these helpful mobile skills.
What is the best resolution (DPI) to use for scanning old family photos?
600 DPI is the ideal resolution for preserving the fine details in old family photographs. While 300 DPI is perfect for standard text letters, photos need a higher setting to look sharp if you ever decide to print them again. Keep in mind that higher resolution creates a larger file size. This might take a little longer to save to your computer, but the beautiful results are worth the extra wait.
My scan looks very dark or blurry; how can I fix the quality?
Blurry scans are often caused by a dirty scanner glass or a document that isn't lying flat. Use a soft, lint-free cloth to gently wipe the glass surface. If the image is too dark, look for the "Brightness" or "Exposure" slider in your scan app settings before you click the final button. Adjusting these settings in the preview window helps you get a clear, bright copy on your very first try.
Is it possible to scan a document wirelessly without using a USB cable?
You can absolutely scan without cables if your printer and computer are both connected to the same Wi-Fi network. Look for a steady wireless light on your printer to confirm it's online. Wireless scanning is very convenient, but it can sometimes be slower than using a cable. If you ever have trouble with your wireless connection, our team is available to help you with internet and Wi-Fi troubleshooting.
How do I scan a two-sided document if my printer only scans one side at a time?
To scan both sides of a page, you'll need to scan the first side and then manually flip the paper over. Most scan apps will ask if you want to "Add more pages" after the first scan is done. Place the second side down on the glass and click the button again. The software will then stitch both sides together into a single document for you. It's a simple way to handle double-sided paperwork.
Where can I find the scan app on my computer if it is not on the desktop?
You can find your scan app by using the search bar at the bottom of your screen. Click the magnifying glass icon and type the word "Scan." On a Windows PC, look for the "Windows Scan" app. On a Mac, you can search for "Image Capture." Finding this tool is the first step in mastering how to scan a document from a printer to a computer. If the app still doesn't appear, you might need to install your printer software again.


